Halloween Mini Pizzas
If you’re looking for a fun and festive way to celebrate Halloween, these Halloween Mini Pizzas are just the ticket! They’re not only adorable with their ghost, mummy, and jack-o’-lantern designs, but they also make for a delicious snack or appetizer that everyone can enjoy. Whether it’s a busy weeknight or a lively family gathering, this recipe sparks joy and creativity in the kitchen.
What I love most about these Halloween Mini Pizzas is how easy they are to prepare. You can let your kids join in on the fun by decorating their own pizzas, making it a perfect activity for after-school snacks or Halloween parties. Trust me, once everyone gets involved in creating these spooky treats, laughter and smiles are guaranteed!
Why You’ll Love This Recipe
- Quick to Prepare: With just 15 minutes of prep time, you’ll have these spooky mini pizzas ready in no time.
- Kid-Friendly Fun: Kids will love getting creative with toppings and personalizing their own pizzas.
- Versatile Options: You can easily customize the toppings based on what you have at home or dietary preferences.
- Perfect for Any Occasion: These mini pizzas are great for Halloween parties or as a cozy family dinner.
- Deliciously Wholesome: Using simple ingredients means you get to enjoy tasty treats without any fuss.
Ingredients You’ll Need
Gathering the right ingredients is half the fun! For these Halloween Mini Pizzas, you’ll need some simple and wholesome items that you probably already have in your kitchen. Here’s what you’ll need to create these delightful treats:
For the Pizzas
- 8 mini pizza crusts (store-bought or homemade)
- 1 cup pizza sauce
- 2 cups shredded mozzarella cheese
For the Decorations
- 8 slices mozzarella cheese (for ghost shapes)
- 12 slices turkey pepperoni
- 1 small black olive (sliced for eyes)
- 1 orange bell pepper (cut into pumpkin shapes)
Variations
One of the best parts about making Halloween Mini Pizzas is how flexible this recipe can be! Feel free to mix things up and try out different toppings that suit your taste.
- Swap the protein: Use veggie pepperoni or diced veggies instead of turkey pepperoni for a vegetarian twist.
- Change up the cheese: Try using different cheeses like cheddar or vegan cheese alternatives for unique flavors.
- Add extra veggies: Top your pizzas with mushrooms, bell peppers, or spinach for an added nutritional boost.
- Make them spicy: Sprinkle some crushed red pepper flakes on top if you’re looking for a little heat!
How to Make Halloween Mini Pizzas
Step 1: Preheat Your Oven
Preheat your oven to 400°F (200°C) so it’s nice and hot when you’re ready to bake your mini pizzas. This step is important because it ensures that your crusts become golden and crispy while keeping the toppings perfectly melted.
Step 2: Prepare Your Crusts
Line a baking sheet with parchment paper and place your mini pizza crusts on it. Spread pizza sauce evenly over each crust. This creates a flavorful base that makes each bite delicious!
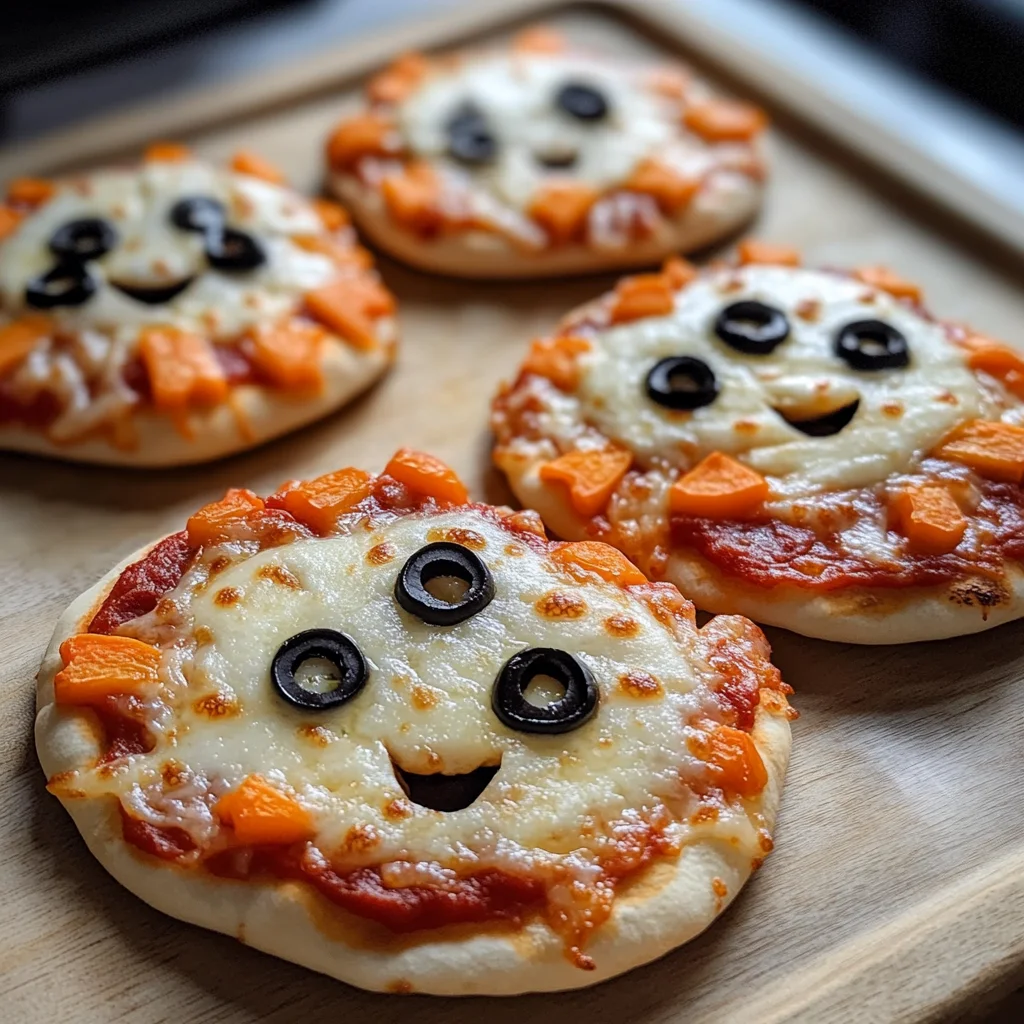
Step 3: Create Ghost Pizzas
For the ghost-themed pizzas, cut ghost shapes out of mozzarella slices and place them on top of the sauce. Use sliced olives for eyes to make them look extra spooky! It’s all about having fun with decoration here.
Step 4: Assemble Mummy Pizzas
Next, layer strips of mozzarella over the sauce in a criss-cross pattern to form mummies. Don’t forget those olive slices as eyes—they’re essential for giving your mummies character!
Step 5: Craft Jack-O’-Lantern Pizzas
For jack-o’-lantern pizzas, sprinkle shredded cheese over the sauce and arrange orange bell pepper slices into faces. This adds a festive touch that everyone will love!
Step 6: Bake to Perfection
Bake your mini pizzas in the preheated oven for 8-10 minutes or until the cheese is melted and bubbly while the crust turns golden brown. The aroma wafting through your kitchen will be irresistible!
Step 7: Serve Warm
Once they’re baked to perfection, serve your Halloween Mini Pizzas warm. Enjoy them with friends and family—these delightful bites are sure to bring smiles all around as you celebrate together!
Pro Tips for Making Halloween Mini Pizzas
Creating these spooky treats can be a delightful experience, so here are some tips to ensure your Halloween Mini Pizzas turn out perfectly!
-
Use fresh ingredients: Fresh toppings not only enhance the flavor but also make your mini pizzas look more appealing and festive.
-
Get creative with shapes: Use cookie cutters to create fun shapes from the cheese and veggies. This adds an extra layer of excitement for kids and makes your pizzas even more Halloween-themed.
-
Pre-bake crusts: If you’re using homemade dough, consider pre-baking the crusts for a couple of minutes before adding toppings. This helps achieve a crispier base.
-
Experiment with toppings: Feel free to mix in other toppings like bell peppers, mushrooms, or olives for added flavor. Just keep in mind the spooky theme!
-
Make it a family activity: Invite the kids to help decorate the pizzas. It’s a fantastic way to bond and get them excited about cooking!
How to Serve Halloween Mini Pizzas
Presenting your Halloween Mini Pizzas in a fun way can elevate their spookiness! Here are some ideas on how to serve this delightful dish.
Garnishes
-
Fresh basil leaves: Adding a few fresh basil leaves on top brings a pop of color and freshness that complements the cheesy goodness.
-
Sprinkled oregano or Italian seasoning: A light dusting of dried herbs adds aromatic flair and enhances the overall flavor profile.
Side Dishes
-
Crispy veggie sticks: Serve sliced carrots, cucumbers, and bell peppers alongside hummus or ranch dip for a crunchy contrast to the cheesy pizzas.
-
Spooky salad: Create a salad with mixed greens topped with cherry tomatoes and slices of avocado. You can arrange them in ghostly shapes for added fun!
-
Pumpkin soup: A warm bowl of pumpkin soup is perfect for fall and pairs wonderfully with mini pizzas, making it a comforting meal.
-
Fruit kabobs: Assemble colorful fruit skewers using grapes, strawberries, and melon balls. They add sweetness to balance the savory pizzas while keeping things festive!
With these serving suggestions and pro tips, your Halloween gathering will surely impress everyone. Happy cooking—and enjoy those deliciously spooky mini pizzas!

Make Ahead and Storage
These Halloween Mini Pizzas are not just fun to make; they’re also perfect for meal prep! You can prepare the mini pizzas ahead of time, making them a fantastic option for busy weeknights or spontaneous parties.
Storing Leftovers
- Allow the mini pizzas to cool completely.
- Place them in an airtight container.
- Store in the refrigerator for up to 3 days.
Freezing
- Prepare the mini pizzas as instructed but do not bake them.
- Wrap each pizza individually in plastic wrap.
- Place wrapped pizzas in a freezer-safe bag or container.
- They can be frozen for up to 2 months.
Reheating
- For refrigerated mini pizzas, preheat the oven to 350°F (175°C).
- Bake for about 5-7 minutes or until heated through.
- For frozen mini pizzas, bake from frozen at 400°F (200°C) for about 12-15 minutes.
FAQs
Here are some common questions you might have about making these Halloween Mini Pizzas!
Can I customize the toppings on my Halloween Mini Pizzas?
Absolutely! These mini pizzas are versatile. Feel free to add your favorite toppings like mushrooms, bell peppers, or different types of cheese to make them uniquely yours.
How long do Halloween Mini Pizzas take to cook?
The cooking time is quick! After assembling your Halloween Mini Pizzas, they typically take about 8-10 minutes in a preheated oven at 400°F (200°C) until the cheese is melted and bubbly.
Can I make Halloween Mini Pizzas ahead of time?
Yes, you can! Prepare and assemble your Halloween Mini Pizzas in advance and store them in the fridge or freezer. They’re great for meal prep!
Final Thoughts
I hope you enjoy making these delightful Halloween Mini Pizzas as much as I do! They’re not only a hit at parties but also a fun way to bring family together in the kitchen. With their spooky designs and delicious flavors, these mini pizzas will surely become a cherished tradition. Happy cooking, and may your Halloween be filled with joy and tasty treats!
Halloween Mini Pizzas

Halloween Mini Pizzas are the perfect blend of creativity and deliciousness for your next festive gathering. These adorable mini pizzas come to life with playful designs that kids will love, making them an ideal snack or appetizer for Halloween parties or cozy family dinners.
- Prep Time: 15 minutes
- Cook Time: 10 minutes
- Total Time: 25 minutes
- Yield: Serves 8
- Category: Appetizer
- Method: Baking
- Cuisine: American
Ingredients
- 8 mini pizza crusts (store-bought or homemade)
- 1 cup pizza sauce
- 2 cups shredded mozzarella cheese
- 8 slices mozzarella cheese (for ghost shapes)
- 12 slices turkey pepperoni
- 1 small black olive (sliced for eyes)
- 1 orange bell pepper (cut into pumpkin shapes)
Instructions
- Preheat your oven to 400°F (200°C).
- Line a baking sheet with parchment paper and arrange the mini pizza crusts.
- Spread an even layer of pizza sauce on each crust.
- For ghost pizzas, cut mozzarella slices into ghost shapes and place them on top; use olive slices for eyes.
- For mummy pizzas, layer strips of mozzarella over the sauce, adding olive slices for eyes.
- For jack-o'-lantern pizzas, sprinkle shredded cheese and use bell pepper slices for facial features.
- Bake in the oven for 8-10 minutes until the cheese is melted and bubbly.
Nutrition
- Serving Size: 1 mini pizza
- Calories: 225
- Sugar: 2g
- Sodium: 500mg
- Fat: 10g
- Saturated Fat: 5g
- Unsaturated Fat: 4g
- Trans Fat: 0g
- Carbohydrates: 26g
- Fiber: 2g
- Protein: 10g
- Cholesterol: 20mg